
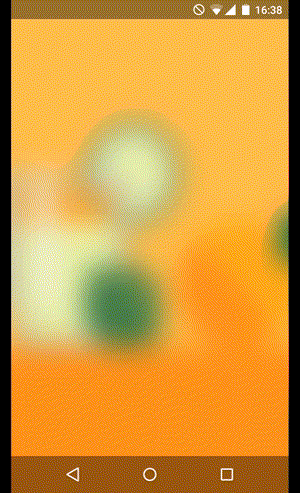
Dynamic blurred app background
My team at GG Network added a very nice effect to Open FM – an on-line radio player that we rebuilt from the ground in the second half of 2014. We used a blurred version of a content image as the application background. I want to share with you the steps we’ve taken to implement this.
It seemed at first like quite a task. Android doesn’t use blur anywhere in the system UI (at least not since Froyo), neither do any of the AOSP or Google apps, so it seemed there will be no example code to rely on. In the end it wasn’t that hard – there may not be a blur() function in any of the framework classes, but what’s available is almost as straightforward.
Blurring an image seems like the most important part of the job. However, there are already quite a few writeups on how to do that on Android. I’ll gloss over this part and instead describe the whole process to use this technique in practice to achieve the full effect. If you are only interested in blurring then you can learn all about it by following these links:
- http://blog.stylingandroid.com/blurring-images-part-1 (part 1 of 7, all are worth the read)
- https://gist.github.com/ryanbateman/6667995
- https://gist.github.com/Mariuxtheone/903c35b4927c0df18cf8
I will warn you that we use Picasso for image loading and caching in our applications. You will see it simplifies implementing this effect. If you don’t use Picasso then I would advise you to start using it. Otherwise, you’ll have to figure out how to adapt our code, but I’m pretty sure you’ll be able to.
Step 1: Change the application background with Picasso.
We started by setting the application background with Picasso. In our BaseActivity code we added a method looking something like this:
1 2 3 4 5 | |
For this to work we needed to implement Target interface in our BaseActivity class:
1 2 3 4 5 6 7 8 9 10 11 12 13 14 15 | |
Step 2: Plug in a custom Transformation
Picasso is great even if you want only the base use case. But it’s a powerful tool for custom effects too. It lets you apply Transformations while loading images, so we can do something like that:
1 2 | |
(Actually, this is an oversimplified example. You should reuse an instance of Transformation object, not create a new one every time you load a new image. You can see that in the final demo code.)
Picasso doesn’t come with a BlurTransformation class out of the box, so we needed to create one. Transformation is an interface with two methods you have to implement. So we started with something along those lines:
1 2 3 4 5 6 7 8 9 10 11 12 13 14 15 16 17 18 19 | |
It’s pretty straightforward. In the transform() method you get passed a Bitmap and you have to return a Bitmap. There are two important things to remember:
- If you return a newly created
Bitmap(as opposed to a mutated inputBitmap) from thetransform()method then you have to callrecycle()on the inputBitmap. You’ll see an example of that in the next step. - In the
key()method you should take into account all the variables that influence how the resultingBitmaplooks. In this example we added the blur radius to the key. This way if you blur the same sourceBitmapwith different radii, Picasso can cache both of them and correctly return each one when appropriate.
Step 3: Blur that Bitmahp already!
If you look at the writeups and gists I’ve linked at the beginning then you’ll find code that is pretty much ready to just drop into the transform() method and this is what we just did:
1 2 3 4 5 6 7 8 9 10 11 12 13 14 15 16 17 18 19 20 21 22 | |
That looks quite complete. But there are still some details and problems to iron out. First of them is that ScriptIntrinsicBlur accepts a maximum radius of 25. Try to pass it a bigger radius and it’ll plainly crash. However, if you decide you need a bigger blur there are some workarounds. We could think of two:
- You could run
ScriptIntrinsicBlurmultiple times. - You could blur a downscaled version of a bitmap and then stretch it to the original size again. This would also stretch the final blur radius, but you would have to obviously watch for the quality loss.
But let’s move on to some more important issues.
Step 4: Make it run pre API 17
The above code works only starting from API 17 and that might be too high for most apps. Renderscript was available earlier, but ScriptIntrinsicBlur was only added in API 17. Fortunately there’s a support lib for that. Here’s an official blog post about it
Wait what? Eclipse? What about Android Studio and Gradle? Not a problem, fortunately there’s DSL for that! Just add this to your build.gradle:
1 2 3 4 5 | |
Now you can go back as far as API 8 if you want (or need) to! (If you didn’t read the linked blog post, for which I don’t blame you since it’s about Ehclipse, a little hint: you also need to change the imports.)
Step 5: Fight with the artifacts
That looks like we’re done (we aaaalmost are). It looks great on a test device, at least on a couple of test images. But when we ran it on a wide variety of images or on specific devices (like Samsung Galaxy S3), we started to see some nasty artifacts. It took us some precious time to find a solution to it, so I’m just going to save you this time and point you right to Roman Nurik’s G+ post that is a great help.
Thanks Roman! OK, so let’s just crop some pixels if our width is not a multiple of four:
1 2 3 4 5 | |
For the actual resize I am using here our internal BitmapUtils class which does the heavy lifting (including recycling the original bitmap as it returns a cropped copy). To keep things simple I will not go into how exactly we do this. You probably already have a similar util in your code. If not there are probably many great resources on how to do that (AOSP code for the Gallery app could be one place to start).
Step 6: Release to prod, see it crash
OK, now we really were done. At least we thought so. We couldn’t find any more issues with this code in our internal testing. So we shipped it. And prod come back at us with crashes like it always does.
Fortunately we use Crashlytics and it helped us quickly find the problems. On some devices (judging by their names they were quite exotic ones) the input Bitmap had a config of Config.RGB_565. If you look back on the code from Step 3, you’ll see we created the output bitmap with Config.ARGB_8888. So when Renderscript tried to copy the blurred pixels to the output Bitmap it crashed because of this incompatibility.
So the obvious solution would be to create the output Bitmap with the same config as input one. However, if you tried it (and if you managed to find a device that produces these RGB_565 bitmaps) or if you just researched it, you would find that renderscript doesn’t play nice with this config. Unless you’re into results like in this SO thread.
We thought it’d be a great idea for a hallucinogens simulation app, but it didn’t fit into our music player. What we decided to do is to try to convert the input into ARGB_8888and if that fails we throw an exception inside the transformation. Picasso catches it and handles by calling the error callback. We’ve decided we much rather like to display some static default background, than those trippy images, so that worked for us.
Here’s the code we use for conversion:
1 2 3 4 5 6 7 8 9 10 11 12 13 14 15 | |
Which we call like that before finally passing it to the Renderscript:
1
| |
Bonus: Change the background smoothly
One last thing was added later by my fabulous team mates. It actually had nothing to do with blurring, but it was the +10% awesomeness touch, that made the 90% of the effect. There’s just one problem with gorgeous blurred images that cover user’s screen from edge to edge and are dynamically switched while the app is in use – changing one to another in an instant just doesn’t cut it. It just makes for a really jarring experience when your whole screen flashes from one background to another (and even worse on some devices that sometimes show a solid black background for a few frames).
The solution is obvious, we should smoothly animate from one background to another. TransitionDrawable comes to the rescue. There’s also the problem that Window doesn’t have a getter for current background drawable, but you can work around it by reaching deeper – into the DecorView. Here’s our code:
1 2 3 4 5 6 7 8 | |
Check out the complete code of a working demo app.
Below a preview of the effect. And of course the best live demo you can see on your own phone is the Open FM app in the Play Store. Give it a try - download it and play some songs.
Images for this preview and the demo code were taken from Marie Schweiz’s Lorem Ipsum Illustration. Thanks, Marie!